
Imagine sitting in the comfort of your living room, your favorite track starts to play, and suddenly, you’re enveloped in a sound so crisp and vivid it feels like the artist is performing right in front of you. This isn’t just about hearing music; it’s about experiencing it in its purest form. Welcome to the world of high sensitivity speakers, where every note is a brushstroke, every beat a heartbeat.
The famous High sensitivity speakers, with their exceptional efficiency and superior sound output, stand out as the champions in the realm of audio systems. But, to truly harness their extraordinary capabilities, a precise and thoughtful setup is essential. Whether you’re an audiophile eager to optimize your listening experience, or a home theater enthusiast looking to bring cinematic sound into your space, setting up your speakers correctly is key.
In our guide, Dj Techvibe delves deep into the art and science of setting up high sensitivity speakers. From choosing the perfect spot in your room to calibrating settings that breathe life into every decibel, we’ll walk you through every step with practical, easy-to-follow advice. So, grab your favorite album, prepare to tweak a few settings, and get ready to be astounded by what your speakers can really do when they’re set up perfectly. Let’s turn up the volume on your speaker setup know-how and dial in the details that make for unforgettable audio moments.
Understanding High Sensitivity Speakers
High sensitivity speakers are engineered to achieve superior sound reproduction by utilizing advanced design principles and materials. Some of the benefits of high sensitivivty peakers is that they boast a sensitivity rating typically above 90 decibels (dB), meaning they can produce a specific sound pressure level from just one watt of input power measured at one meter distance. This efficiency is significantly higher compared to average speakers, which usually range from 85 to 88 dB.
Design and Operational Characteristics
The high sensitivity of these speakers is primarily due to their design features, which include lighter diaphragm materials and more efficient motor structures. For example, the diaphragms might be made from ultra-lightweight paper or composite materials that require less energy to move, enhancing their responsiveness to electrical signals. This lightness, combined with a powerful motor system (often featuring large voice coils and strong magnetic circuits), allows these speakers to respond more quickly and with less power loss.
Thiele/Small Parameters and Their Impact
Understanding the Thiele/Small parameters is crucial for advanced users looking to delve into the technical aspects of speaker design. These parameters include the speaker’s resonance frequency (Fs), total electrical quality factor (Qes), and total mechanical quality factor (Qms), among others. High sensitivity speakers are typically designed with a low Fs and optimal Q values to ensure that they can efficiently reproduce sound across a wide frequency range without excessive damping, which is vital for maintaining clarity and detail in the audio output.
Choosing the Right Location for High Sensitivity Speakers
The optimal placement of high sensitivity speakers is a critical factor in achieving the best audio performance. This section provides a detailed, technical guide to selecting the best location within a room, assessing room acoustics, and avoiding common placement mistakes.
Assessing the Room Acoustics
- Room Dimensions and Modal Analysis:
- Begin by understanding the room’s dimensions and how they influence sound waves. Each room has its own set of modal frequencies (resonances) that depend on its length, width, and height. Use modal analysis to identify these frequencies, which can help determine potential problem areas where bass might accumulate or nullify.
- Tools like room mode calculators can assist in this analysis, providing insights into where to place speakers to avoid exciting room modes excessively.
- Reflection Points and First Reflections:
- Identify first reflection points using the mirror trick. Place a mirror on the walls, ceiling, and floor while sitting in the listening position. Any location where you can see the speakers in the mirror from the listening position is a first reflection point.
- Treat these points with acoustic panels or diffusers to control early reflections, which can blur the clarity and details in the sound.
- SBIR (Speaker Boundary Interference Response):
- Consider the impact of SBIR, which involves interference between the direct sound from the speaker and the sound reflecting off nearby surfaces like walls and floors. Position speakers to minimize these issues, typically by placing them at least two to three feet away from front and side walls.
Optimal Placement Techniques
- Stereo Triangle Setup:
- Arrange the speakers and the listening position to form an equilateral triangle. This setup ensures that the sound from each speaker reaches the listener simultaneously, enhancing stereo imaging and providing a balanced sound field.
- Ensure that the tweeters are at ear height when seated, as this is crucial for accurate treble reproduction.
- Room Symmetry:
- Place speakers symmetrically relative to the listening area to avoid uneven sound distribution. Asymmetrical placement can lead to one side of the room sounding different from the other, which distorts the stereo image.
- Distance from Corners:
- Avoid placing speakers too close to corners, as this can excessively boost bass frequencies and lead to a boomy or muddy sound. If limited space necessitates corner placement, consider using bass traps in the corners to absorb excess low frequencies.
Amplification and Matching for High Sensitivity Speakers
Selecting the Right Amplifier
Understanding Amplifier Power Requirements:
- Despite common misconceptions, high sensitivity speakers do not necessarily require high power amplifiers. Due to their efficiency, they can achieve a higher volume at lower power levels. Instead, focus on the quality of the amplifier’s output and its ability to deliver clean power without distortion.
- A good rule of thumb is to select an amplifier whose output power is well-matched to the speaker’s recommended amplifier power range. This avoids underpowering (which can prevent speakers from performing at their best) and overpowering (which risks damaging the speakers).
Low Distortion Characteristics:
- Choose amplifiers with a low Total Harmonic Distortion (THD) rating, typically below 0.1%. High sensitivity speakers can reveal minute imperfections in the signal, so a low-distortion amplifier is critical to maintain the integrity of the sound.
- The intermodulation distortion (IMD) should also be considered, which affects how the amplifier handles complex audio signals at varying frequencies.
Amplifier Class and Sound Quality:
- The class of the amplifier (A, AB, D, etc.) can affect sound quality. Class A amplifiers, for instance, are often favored for their ability to deliver very clean and linear amplification but are less efficient and generate more heat. Class D amplifiers are highly efficient and work well with high sensitivity speakers, especially in applications where space and heat dissipation are concerns.
Importance of Clean Amplification
- Signal Integrity:
- High sensitivity speakers can reproduce the finest details in music, making them susceptible to any noise or imperfections in the amplifier’s output. It is essential that the amplifier provides a clean signal to fully exploit the speakers’ potential.
- Consider amplifiers with a high signal-to-noise ratio (SNR) to minimize background noise.
- Dynamic Range and Headroom:
- Ensure the amplifier can handle dynamic peaks in music without clipping. Adequate headroom is crucial for live recordings or dynamic soundtracks to sound clear and undistorted.
- The dynamic range of the amplifier should complement the dynamic capabilities of the speakers to ensure all nuances of the audio are accurately reproduced.
By carefully selecting and matching the amplifier to your high sensitivity speakers, you can enhance their audio performance dramatically. This ensures that your setup not only sounds exceptional at various volumes but also preserves the longevity and integrity of your audio equipment.
Calibration for Optimal Sound with High Sensitivity Speakers
Understanding the Calibration Process
Calibration involves adjusting the audio output of speakers to ensure that they perform optimally in a specific environment. This process not only balances the speakers’ volume and tonal accuracy across the audio spectrum but also adapts their output to the acoustics of the room. Proper calibration can significantly enhance the clarity, balance, and overall listening experience.
Tools Needed for Calibration
- Sound Level Meter:
- A sound level meter is essential for accurately measuring sound pressure levels (SPL) at various points in the room. A Type 2 sound level meter or better is recommended for precise readings.
- Calibration Microphone:
- Use a calibration microphone to capture sound data. This microphone should ideally have a flat frequency response to ensure accurate measurements. It is typically placed at the listener’s ear height in the primary listening position.
- Audio Analysis Software:
- Software like Room EQ Wizard (REW) or similar can analyze the data collected by the calibration microphone. These tools provide visual feedback on frequency response, phase, and other parameters, helping to identify problem areas in the room’s audio setup.
- Test Tone Generator:
- A test tone generator is used to produce specific frequencies for testing and measuring speaker response. These tones help in adjusting volume levels and equalizing the speakers across the frequency spectrum.
Calibration Steps and Techniques
- Initial Speaker Setup:
- Begin by placing your speakers according to the best practices discussed in the speaker placement section. Ensure they are symmetrically positioned for a balanced stereo image.
- Measurement and Analysis:
- With the calibration microphone at the listener’s position, use the audio analysis software to play test tones through each speaker. Measure the SPL and record the output. Analyze the frequency response and look for any dips or peaks which may indicate room mode effects or reflections.
- Adjusting Speaker Levels:
- Use the sound level meter to adjust the volume of each speaker so that they all produce the same SPL at the listening position. This step ensures a balanced sound field from all listening angles.
- Equalization:
- Apply equalization (EQ) to correct any frequency-specific anomalies. For example, if there’s a peak at 100 Hz, you might apply a narrow EQ dip at this frequency to flatten the response.
- Be cautious with EQ adjustments; avoid excessive boosting of frequencies, as this can lead to distortion.
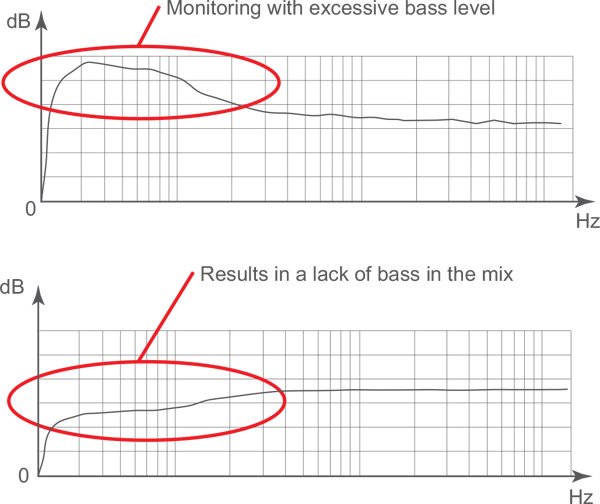
- Fine-Tuning Bass, Midrange, and Treble:
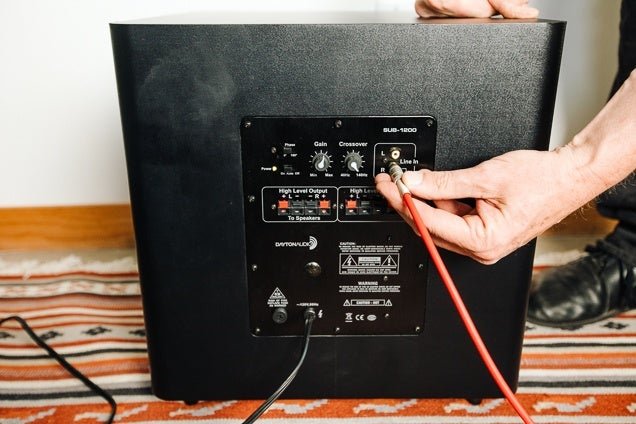
- Bass: Adjust the subwoofer crossover and volume. Use the room’s natural acoustics and the speakers’ response to find the best bass balance that is neither too overpowering nor too weak.
- Midrange: Critical for vocal clarity, adjust the midrange to ensure that vocals sound natural and clear without any muddiness.
- Treble: Adjust the treble to achieve crisp, clear highs without causing listener fatigue. Be mindful of room reflections which can harshly amplify treble frequencies.
- Room Correction Systems:
- If available, utilize built-in room correction systems in your receiver or processor. These systems automatically adjust speaker output based on microphone measurements, which can be particularly helpful for adjusting complex setups.
- Final Listening Test:
- After adjustments, listen to some familiar music or audio tracks. Pay attention to the clarity across different types of content and adjust slightly if necessary.
Maintaining Calibration Settings
Regularly check and tweak your calibration settings as changes in room layout, new furniture, or even different seasons (humidity and temperature can affect sound) might necessitate adjustments.
By following these detailed calibration steps and employing the right tools, you can achieve a finely tuned audio system that maximizes the potential of high sensitivity speakers, providing an exceptional listening experience tailored to your environment and preferences.
Cable and Connection Tips for High Sensitivity Speakers
Understanding the Importance of Quality Cabling
High sensitivity speakers are exceptional in revealing the nuances and subtleties in music that other speakers might not capture. This makes it essential to preserve the integrity of the audio signal from the source to the speakers. Any degradation in the signal can be easily detected due to the detailed sound reproduction capabilities of these speakers. To prevent signal loss, cables used should exhibit low electrical resistance, ensuring that the signal’s power is not significantly diminished over the cable’s length. Materials such as oxygen-free copper or silver are preferred for their high conductivity and low resistance, making them ideal for maintaining signal integrity.
Recommended Types of Cables
For connections between amplifiers and high sensitivity speakers, selecting the right type of speaker cables is crucial. High-quality speaker cables that are adequately thick to handle the required power level and length without significant signal loss are vital. Generally, 12 or 14-gauge cables are recommended for most home audio setups. These gauges provide a good balance between handling power demands and minimizing resistance, which is particularly important for longer cable runs that could potentially lead to power loss and signal degradation.
Ensuring that your high sensitivity speakers are set up with the proper cables and connections is key to achieving the best audio performance. By focusing on high-quality materials and appropriate gauges, you can significantly enhance your listening experience, capturing every detail that your speakers are designed to deliver.
Conclusion: Perfecting Your High Sensitivity Speaker Setup
Throughout this guide, we’ve explored the intricate details and advanced techniques necessary to unlock the full potential of high sensitivity speakers. From understanding the nuanced design and operational characteristics of these speakers to ensuring they are perfectly positioned within your space, each step is crucial for achieving optimal sound quality.
The choice and matching of amplifiers have shown us that power needs to be handled with finesse, emphasizing quality and compatibility over mere wattage to preserve the integrity of the audio output. Calibration has been a focal point, ensuring that the speakers not only blend seamlessly with the acoustics of the room but also respond accurately to the dynamics of the audio they reproduce.
Furthermore, we’ve discussed the importance of using high-quality cables and ensuring proper connections to maintain signal integrity, a critical factor for systems that can reveal the slightest imperfections in sound.
Now armed with this knowledge, you are well-equipped to set up your high sensitivity speakers in a manner that not only meets technical standards but also surpasses your expectations. Remember, the goal is not just to listen to music or watch movies but to experience them in a way that is as close to the artist’s or filmmaker’s original intent as possible. Take your time to experiment with different setups and adjustments; the perfect sound is well worth the effort. Enjoy the clarity and depth that your high sensitivity speakers bring to your audio experiences, and let every listen be an occasion in itself.